AUDUSD outlook

G
@godspowerdan - 2 weeks ago
Quoted - godspowerdan

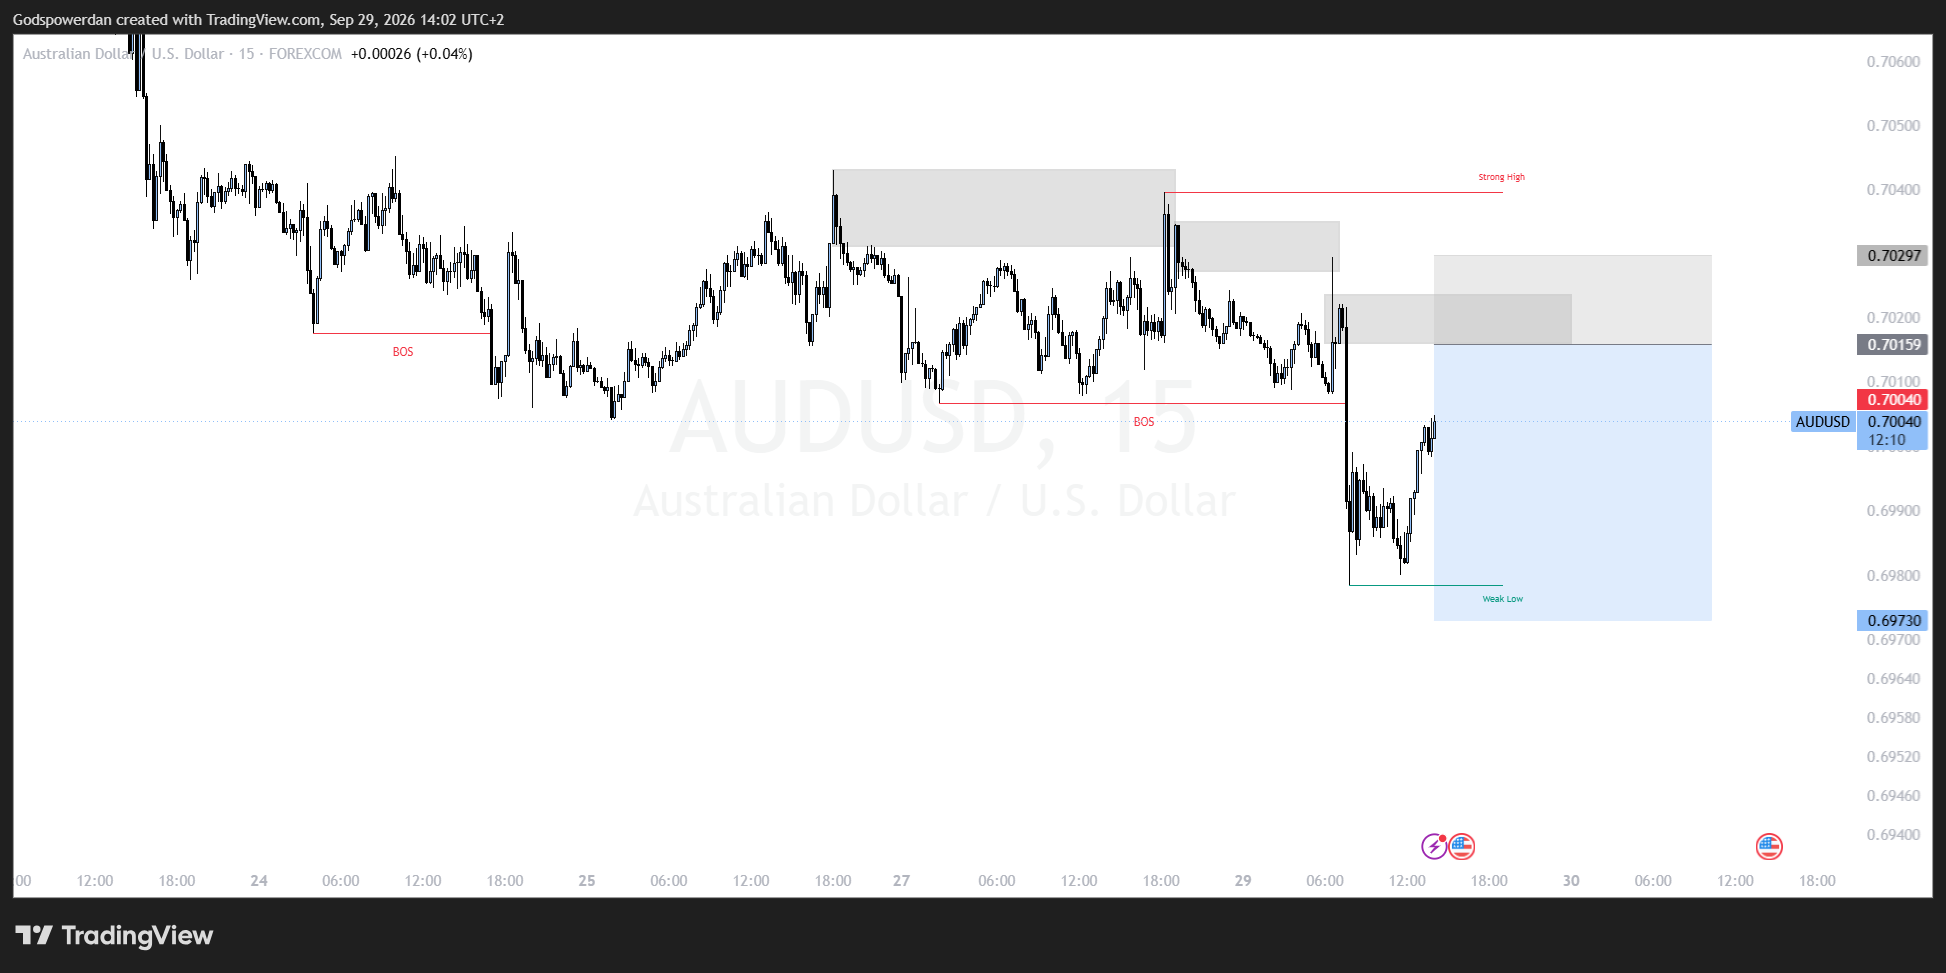
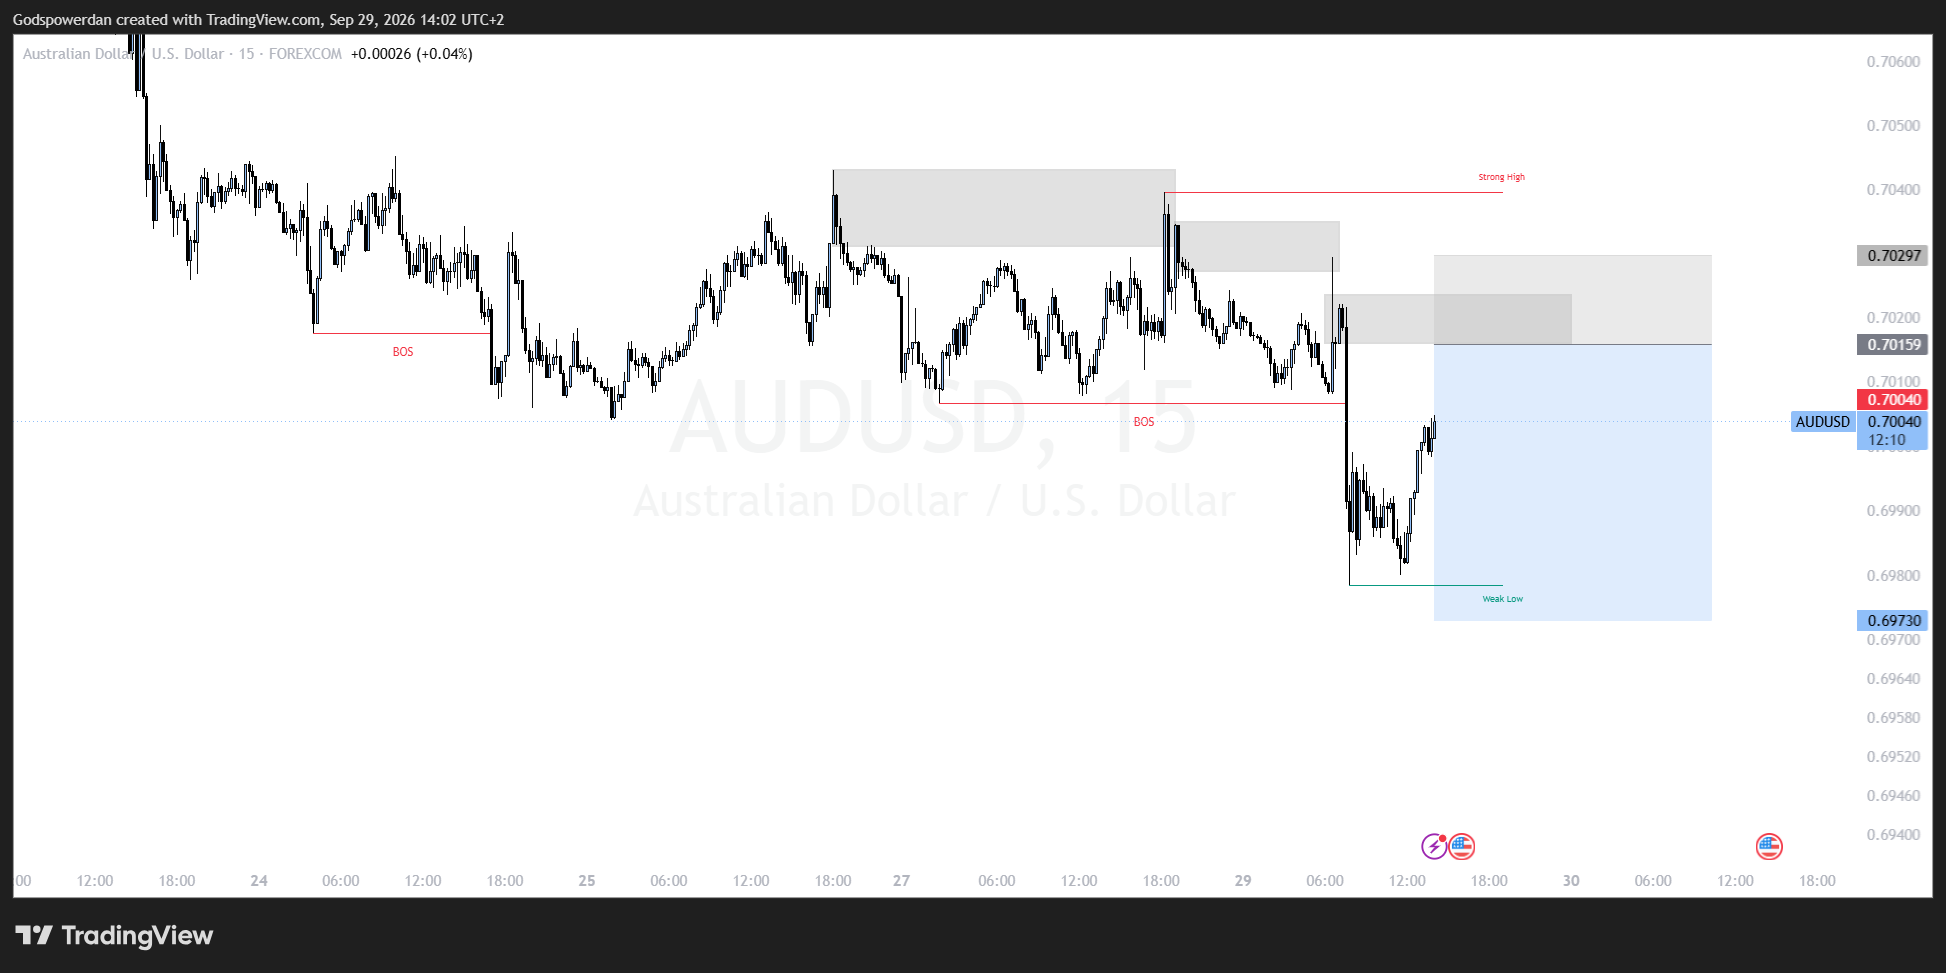
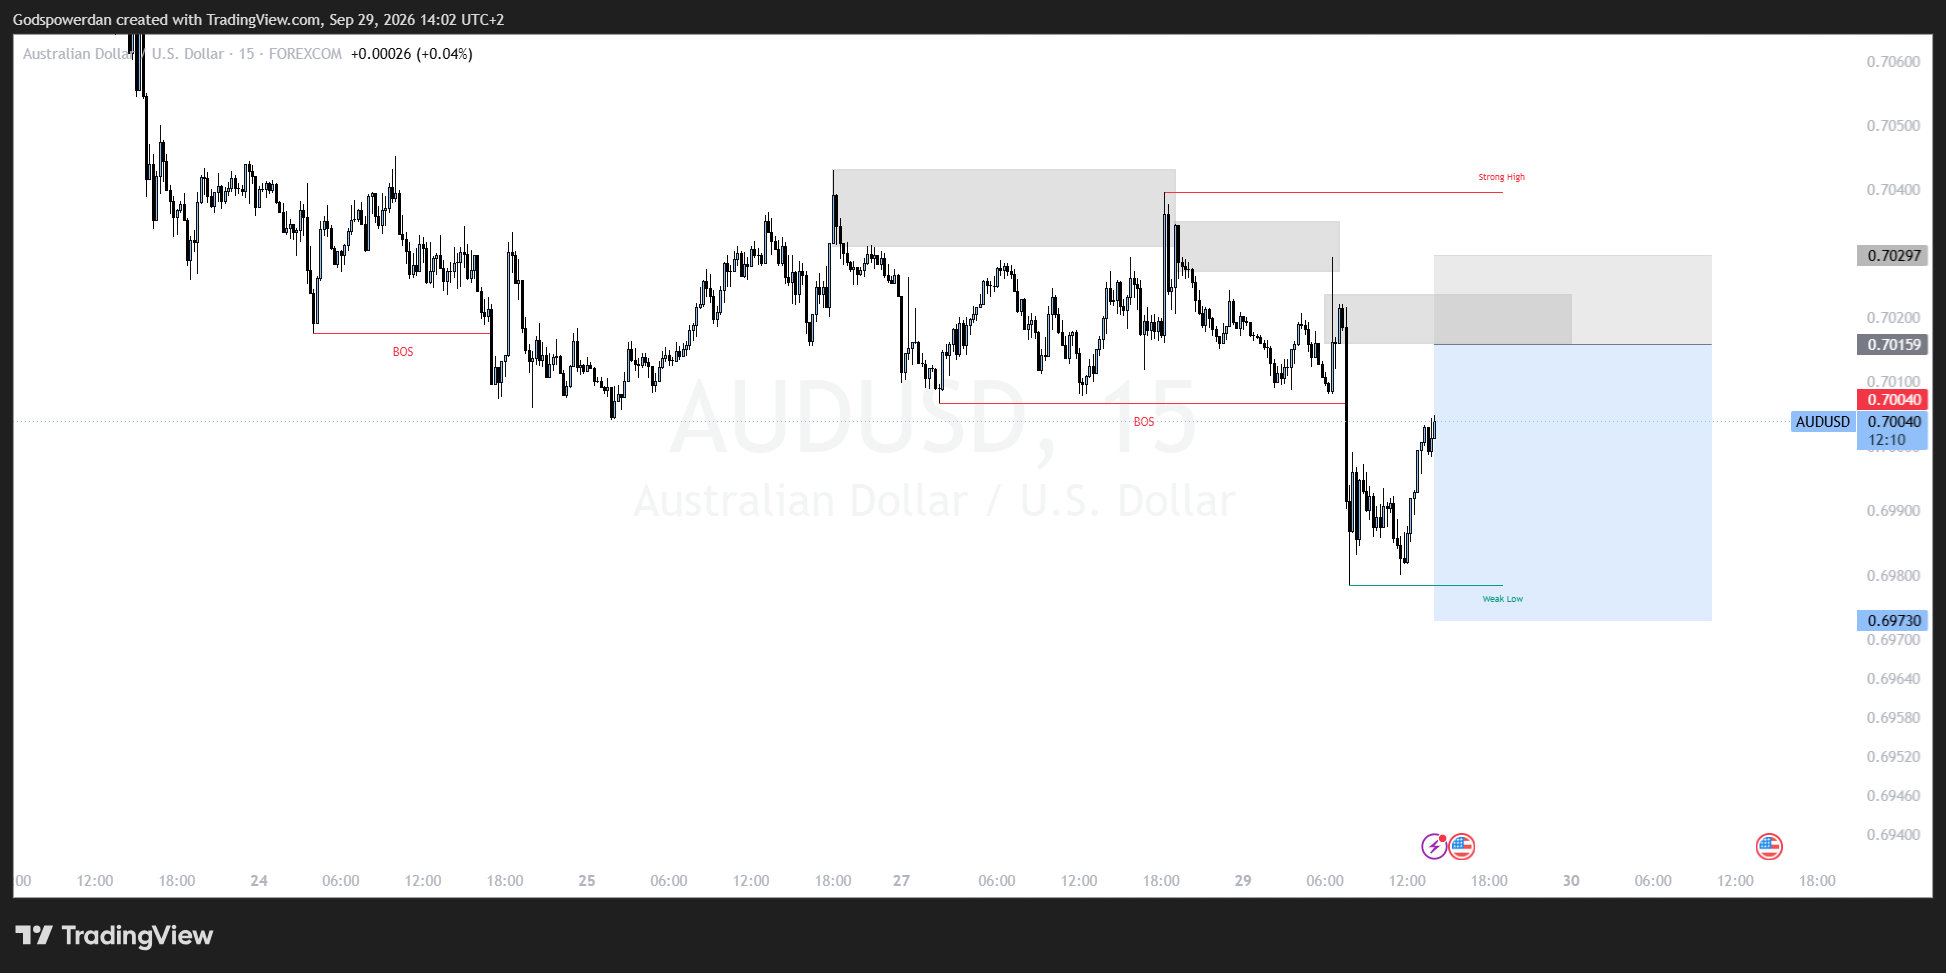
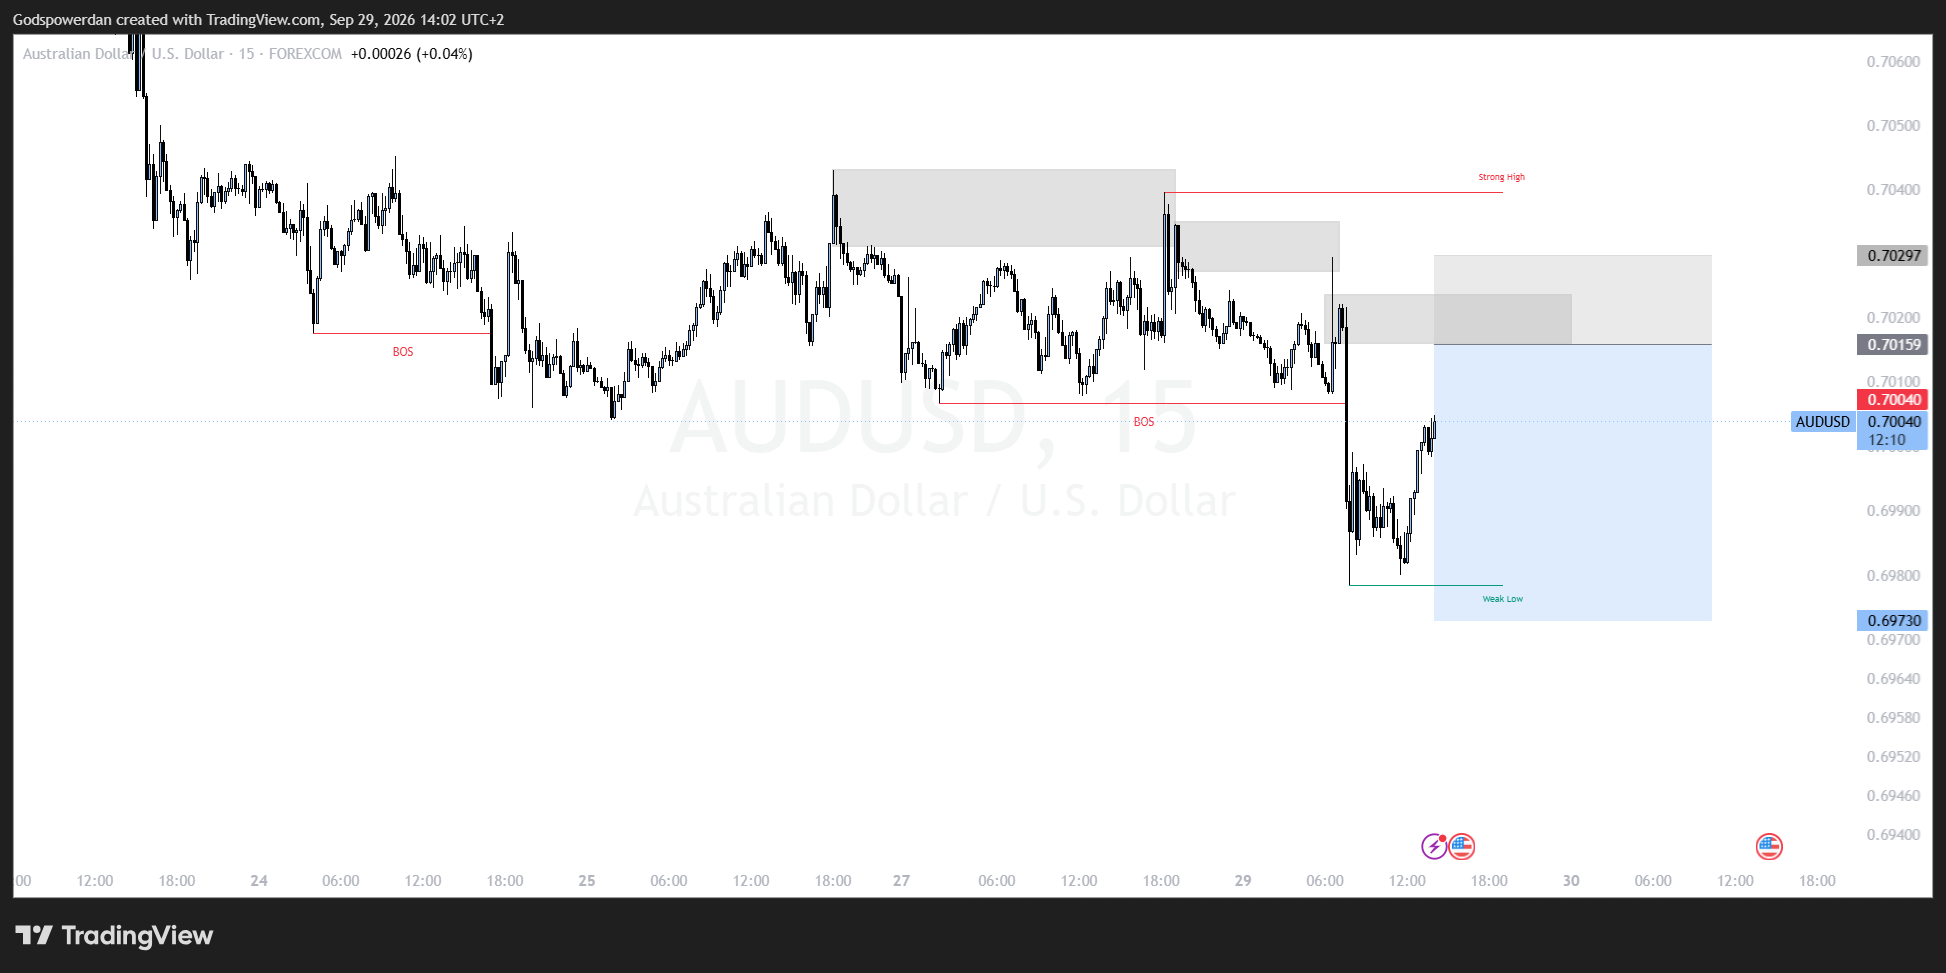
My AUDUSD sell thesis is simple:

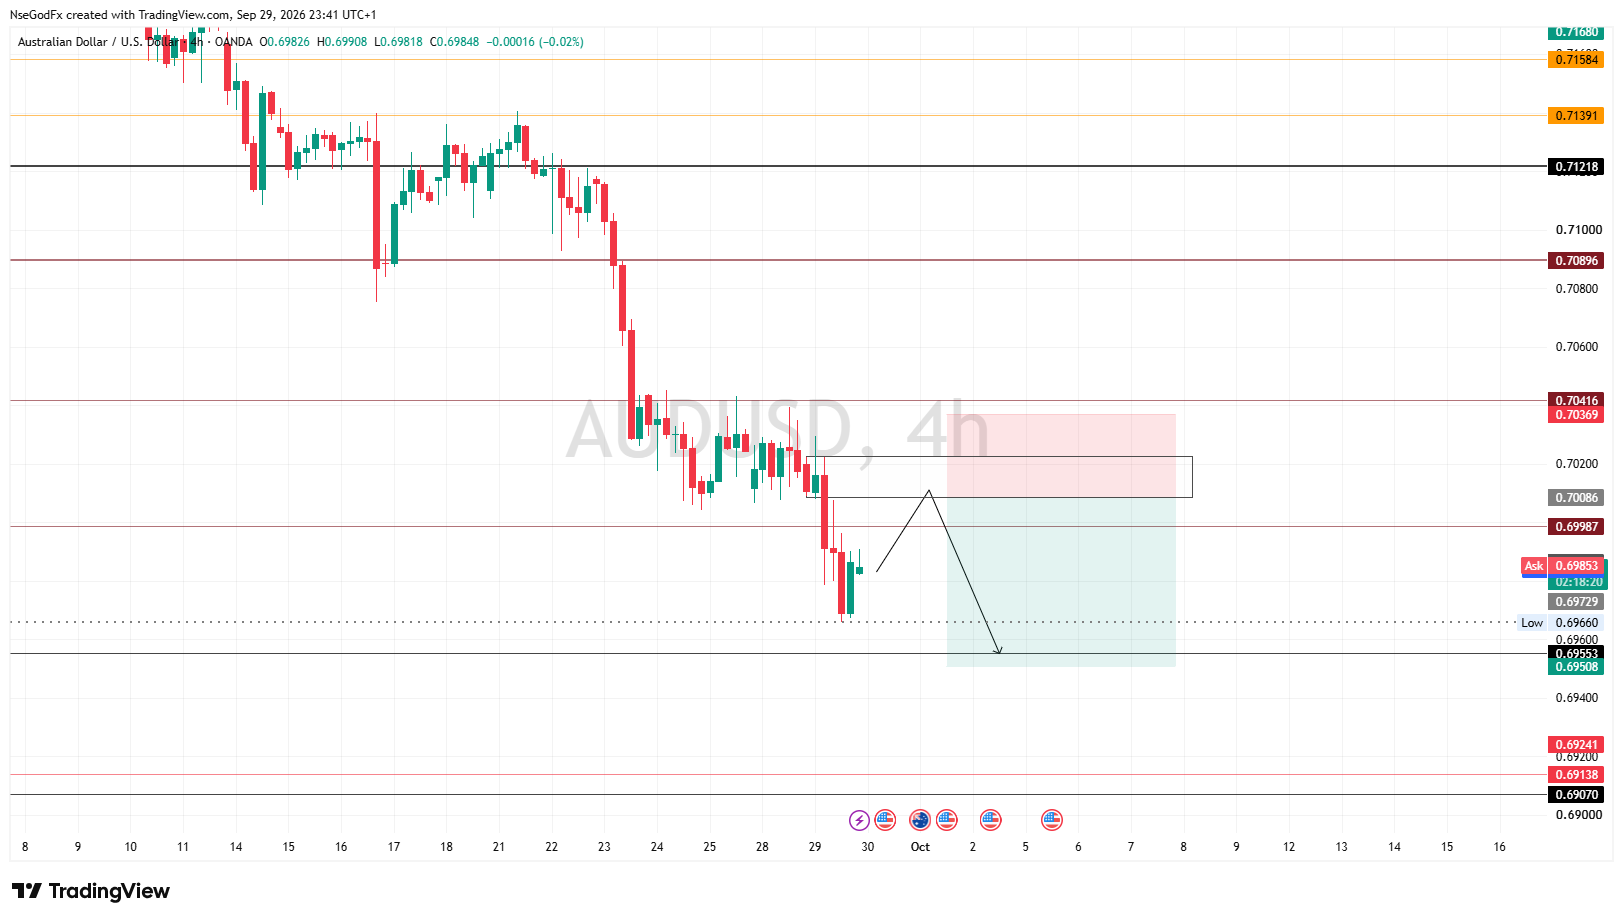
Bearish structure → retracement into supply → continuation lower → take the weak low.

I'm risking only the distance between 0.70159 and 0.70297.

If price invalidates the setup, I'm out.

AUDUSD SELL

Entry: 0.70159

Stop Loss: 0.70297

Take Profit: 0.69730

The setup gives roughly 3R.

The key level I'm targeting is the weak low created after the recent bearish displacement.

G
@godspowerdan - 2 weeks ago
Quoted - godspowerdan

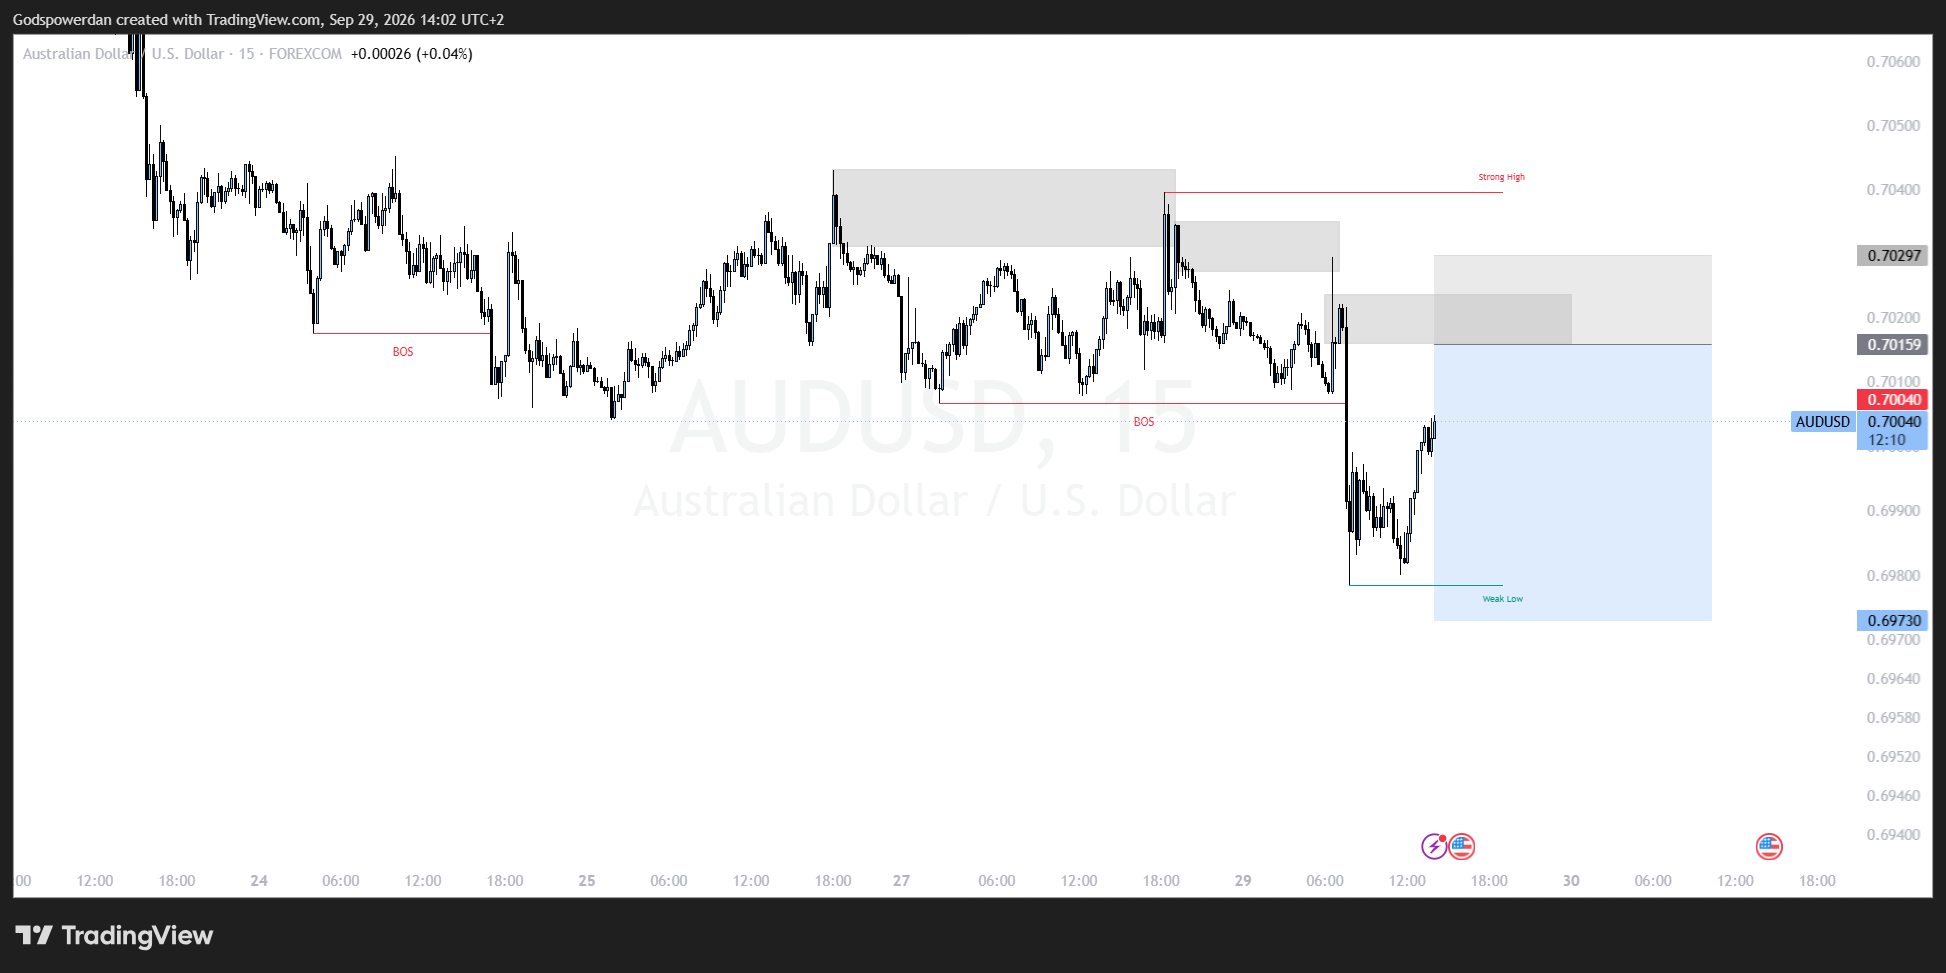
AUDUSD SELL

Entry: 0.70159

Stop Loss: 0.70297

Take Profit: 0.69730

The setup gives roughly 3R.

The key level I'm targeting is the weak low created after the recent bearish displacement.

Price swept higher into the supply area and then delivered strong bearish displacement.

That gives me the narrative I need for the sell.

Now I'm waiting for price to respect the retracement zone.

Sell: 0.70159

SL: 0.70297

TP: 0.69730

G
@godspowerdan - 2 weeks ago
Quoted - godspowerdan

Price swept higher into the supply area and then delivered strong bearish displacement.

That gives me the narrative I need for the sell.

Now I'm waiting for price to respect the retracement zone.

Sell: 0.70159

SL: 0.70297

TP: 0.69730

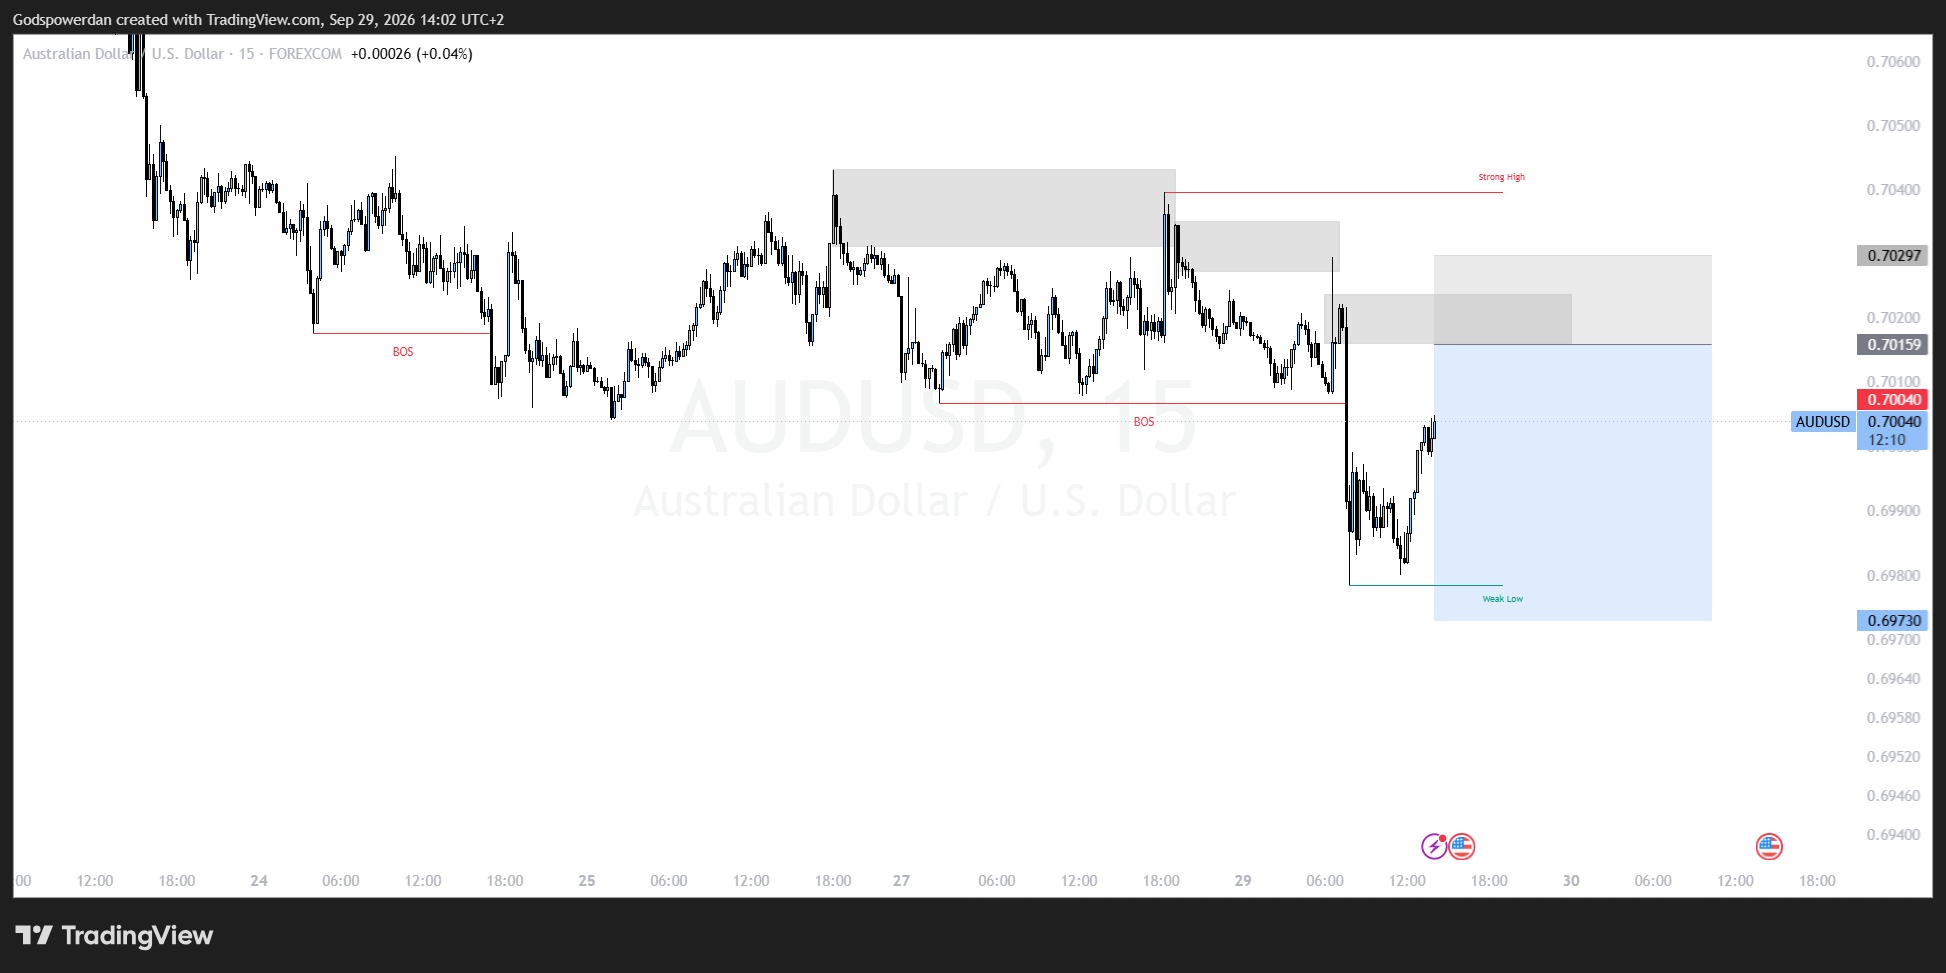
AUDUSD has a clear liquidity draw below.

The recent low is marked as a weak low, which means I'm interested in seeing price return to that area.

My plan:

Sell the retracement → protect the position → target 0.69730.

No need to predict every candle.

G
@godspowerdan - 2 weeks ago
Quoted - godspowerdan

AUDUSD has a clear liquidity draw below.

The recent low is marked as a weak low, which means I'm interested in seeing price return to that area.

My plan:

Sell the retracement → protect the position → target 0.69730.

No need to predict every candle.

The beautiful part of this setup is the risk-to-reward.

Risking approximately 13.8 pips for roughly 42.9 pips of potential reward.

That's around 1:3 R:R.

But the R:R doesn't matter if the structure invalidates.

The setup comes first. The target comes second.

G
@godspowerdan - 2 weeks ago
Quoted - godspowerdan

The beautiful part of this setup is the risk-to-reward.

Risking approximately 13.8 pips for roughly 42.9 pips of potential reward.

That's around 1:3 R:R.

But the R:R doesn't matter if the structure invalidates.

The setup comes first. The target comes second.

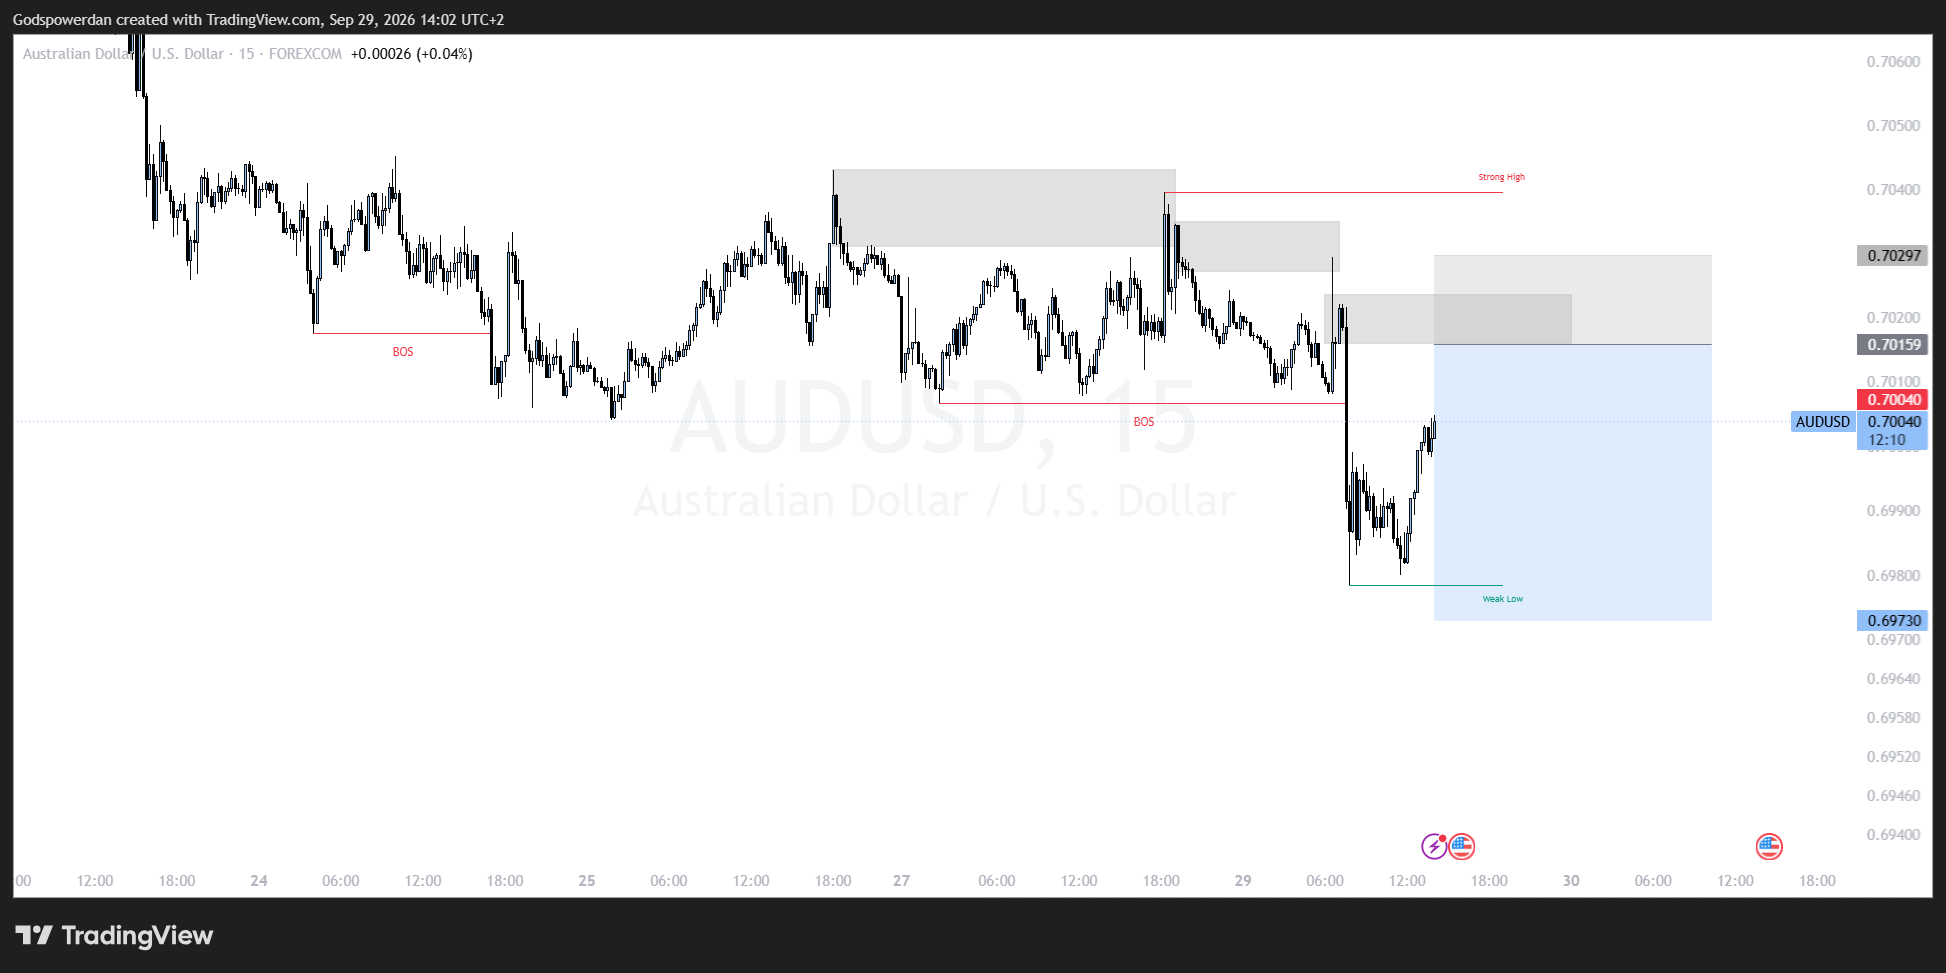
AUDUSD sellers have already shown their hand.

We had the bearish break, followed by a retracement.

I'm watching the supply area around 0.70159–0.70297 closely.

If price respects it, the next objective remains the 0.69730 weak low.

G
@godspowerdan - 2 weeks ago
Quoted - godspowerdan

AUDUSD sellers have already shown their hand.

We had the bearish break, followed by a retracement.

I'm watching the supply area around 0.70159–0.70297 closely.

If price respects it, the next objective remains the 0.69730 weak low.

AUDUSD TRADE MAP

Entry: 0.70159

SL: 0.70297

TP: 0.69730

The idea is to sell from the retracement and target the liquidity resting below.

If price reaches the target, I'll reassess the structure rather than automatically assuming further downside.

G
@godspowerdan - 2 weeks ago
Quoted - godspowerdan

AUDUSD TRADE MAP

Entry: 0.70159

SL: 0.70297

TP: 0.69730

The idea is to sell from the retracement and target the liquidity resting below.

If price reaches the target, I'll reassess the structure rather than automatically assuming further downside.

AUDUSD sell setup is ready.

The market has given me:

• Bearish displacement

• Break of structure

• Retracement into supply

• Weak low as the draw on liquidity

• ~3R potential

SELL @ 0.70159

SL @ 0.70297

TP @ 0.69730

Now it's simply execution and risk management.

G
@godspowerdan - 1 week ago

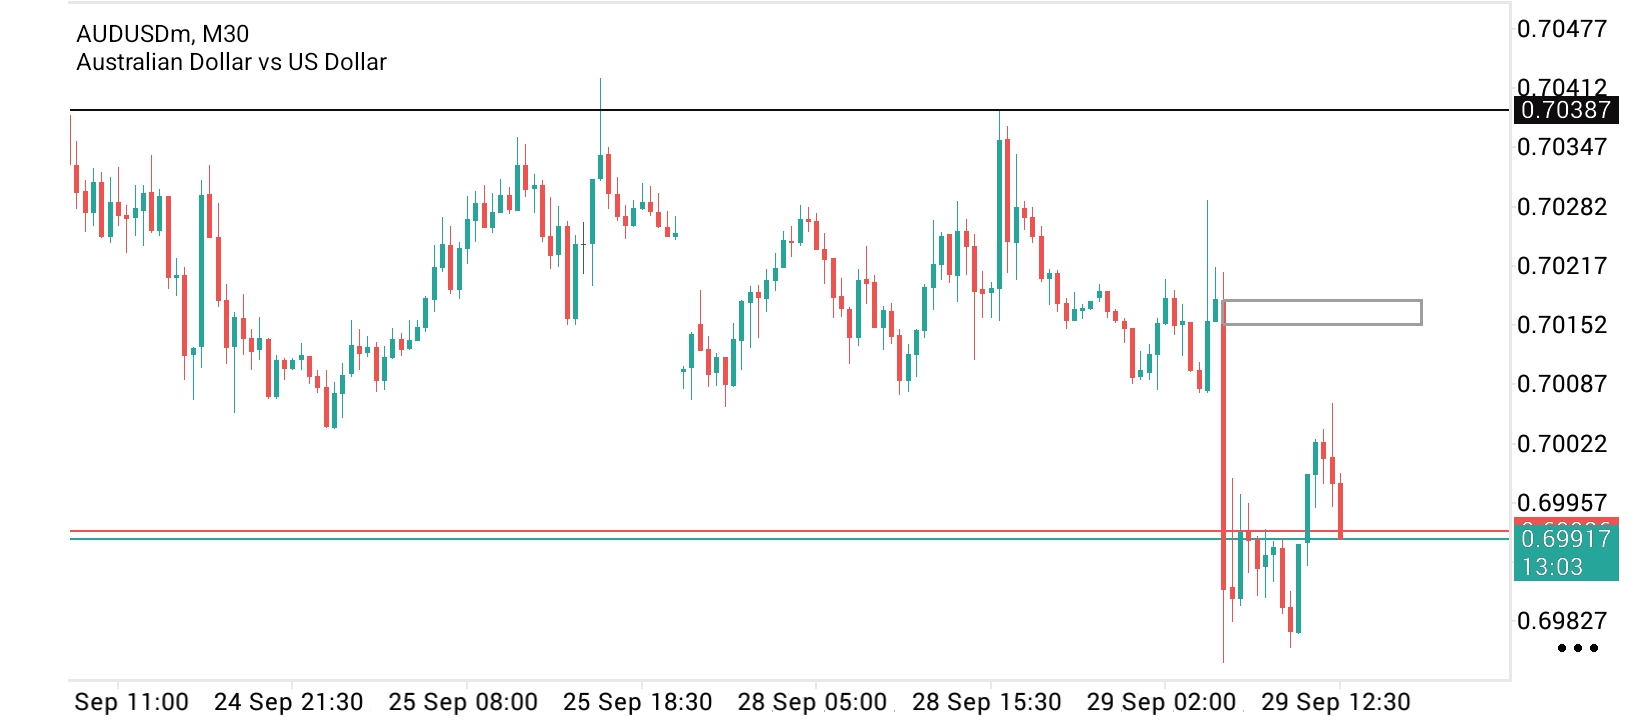
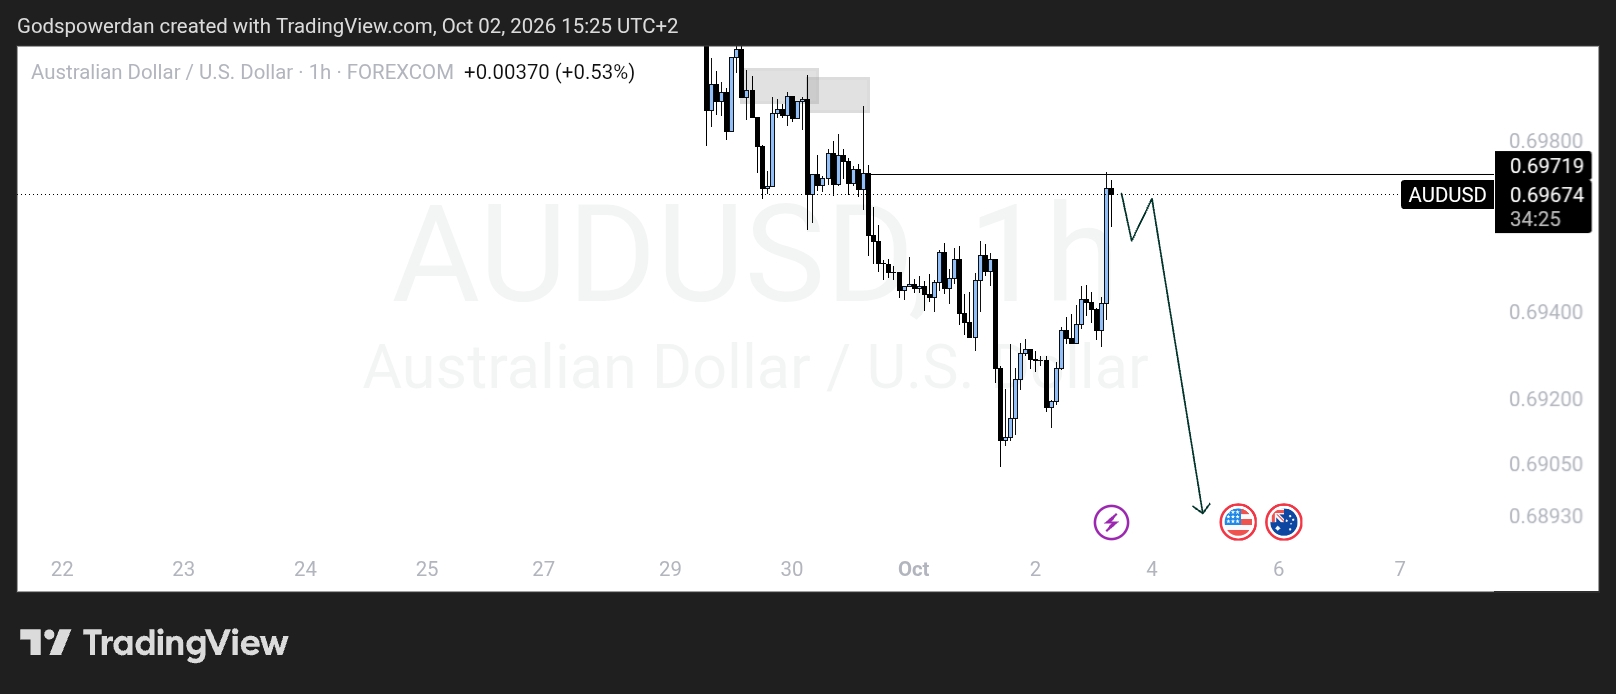
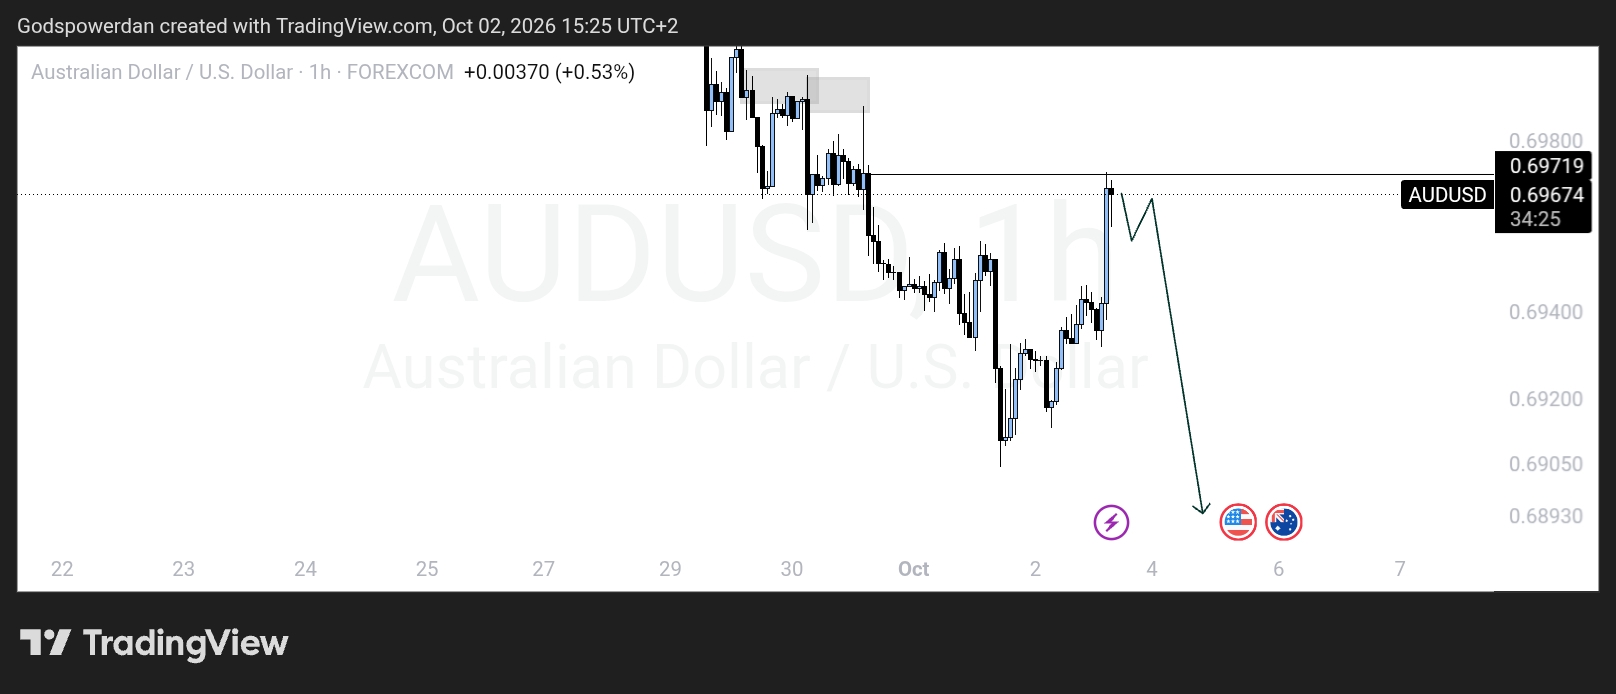
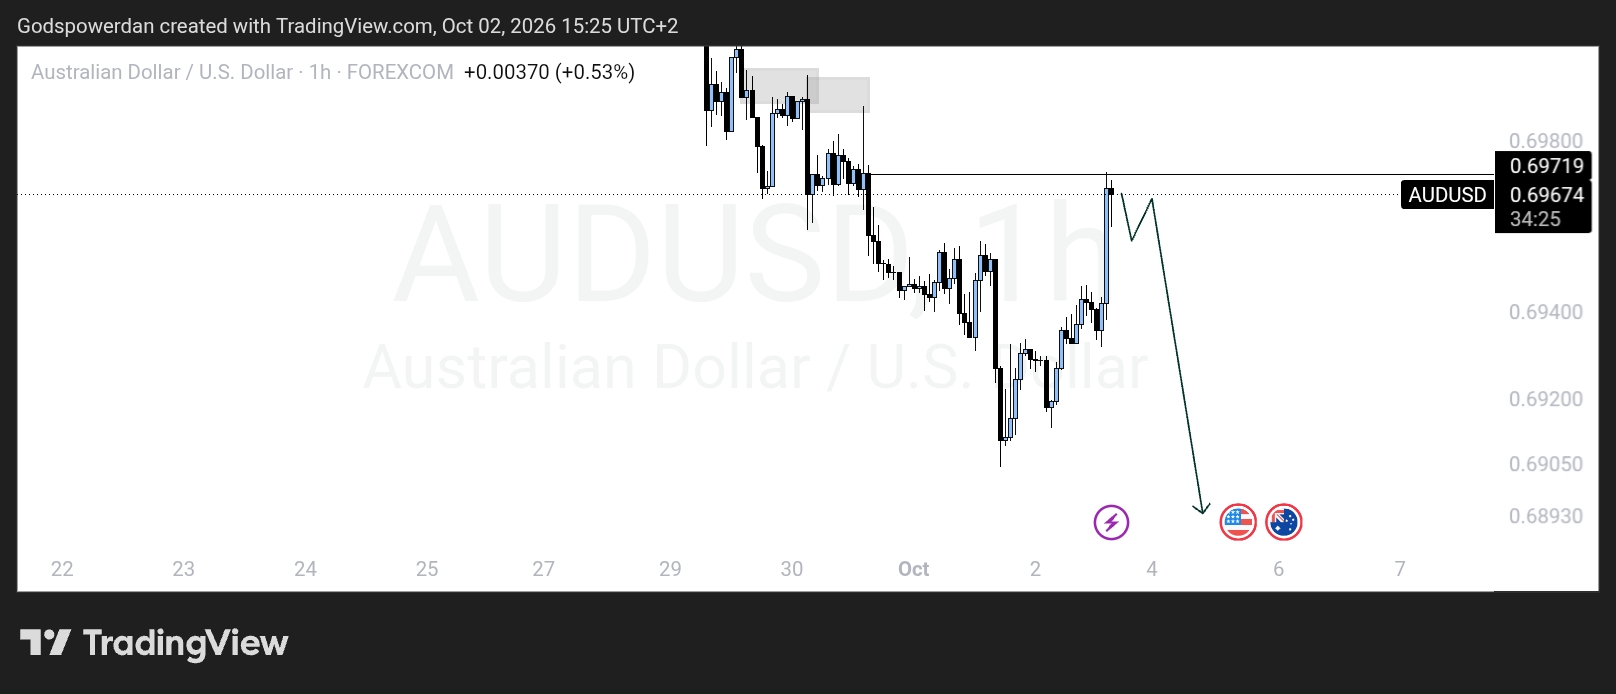
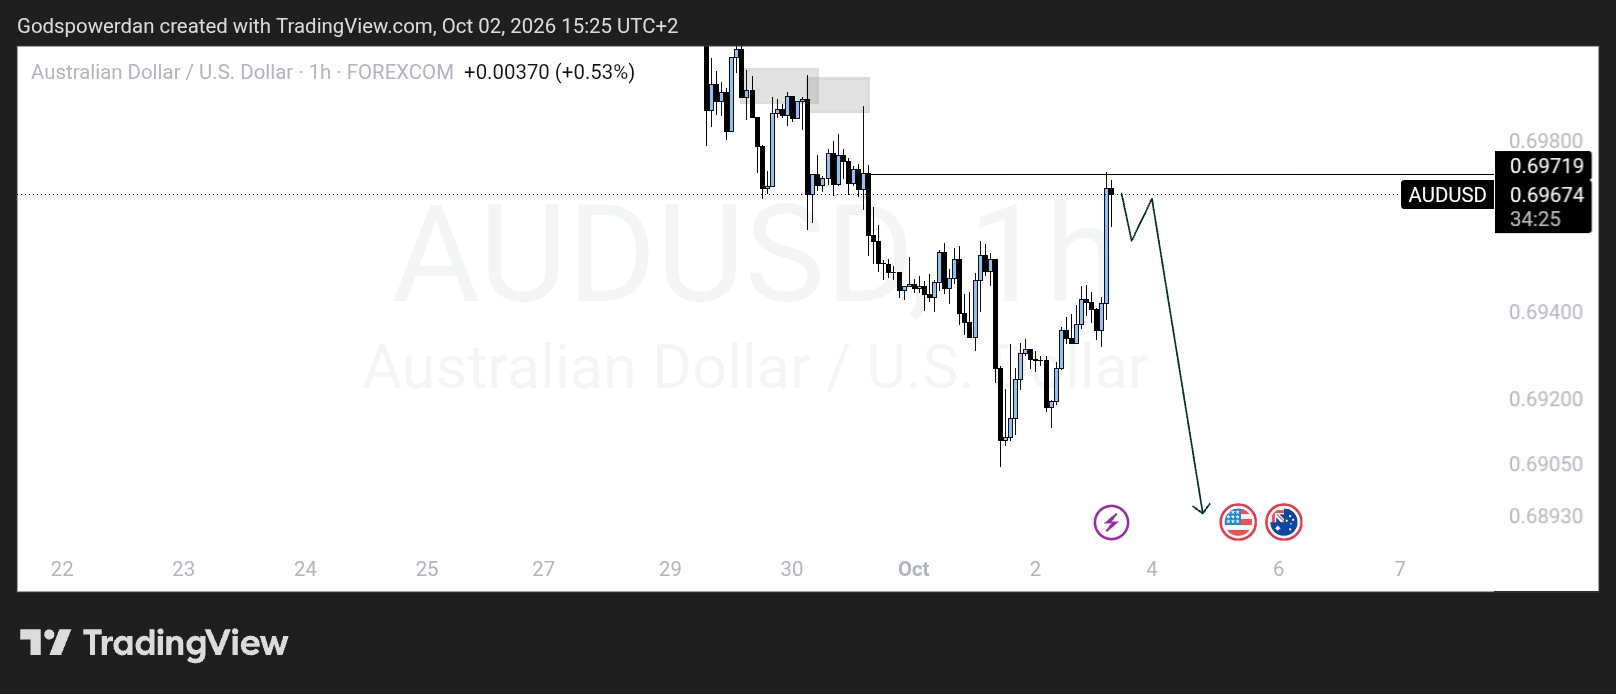
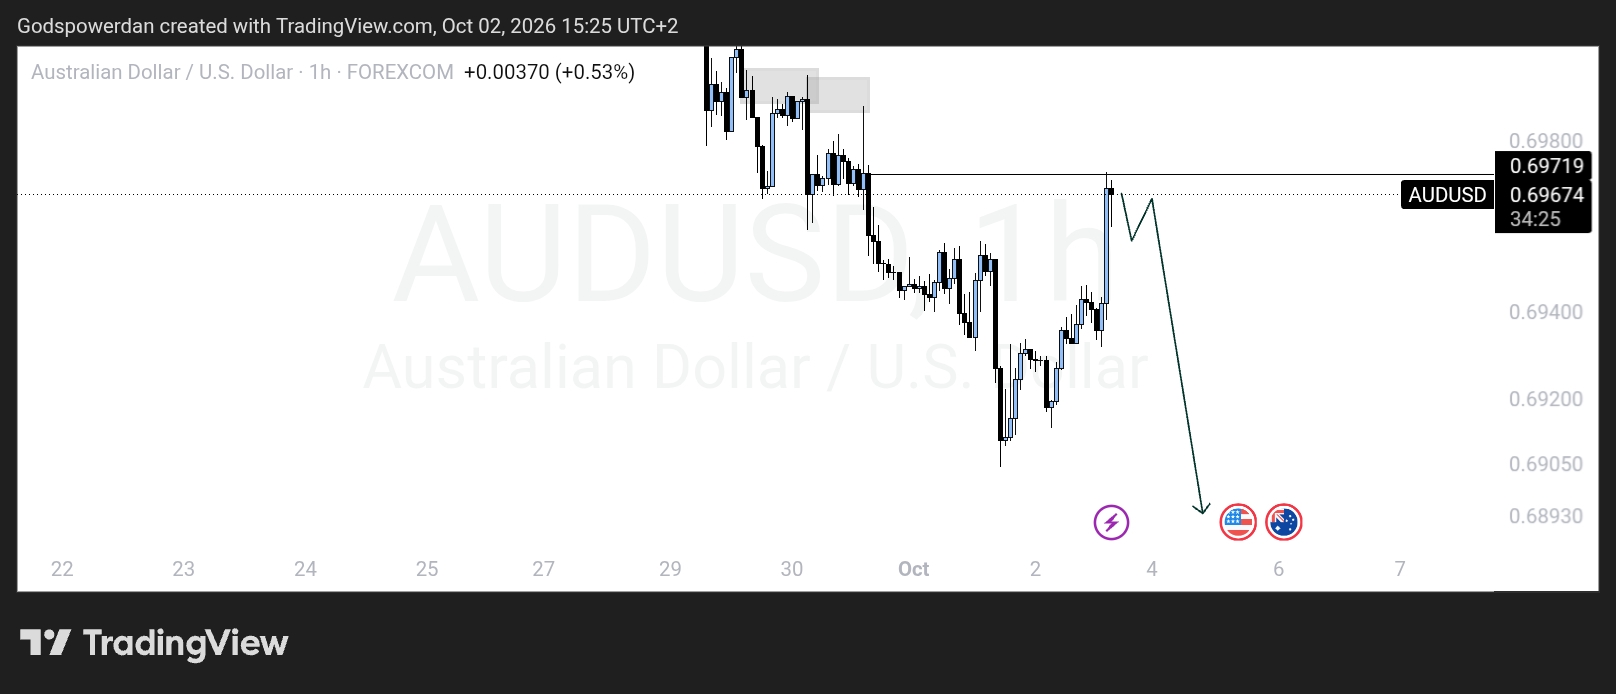
📉 AUDUSD SELL WATCH | H1

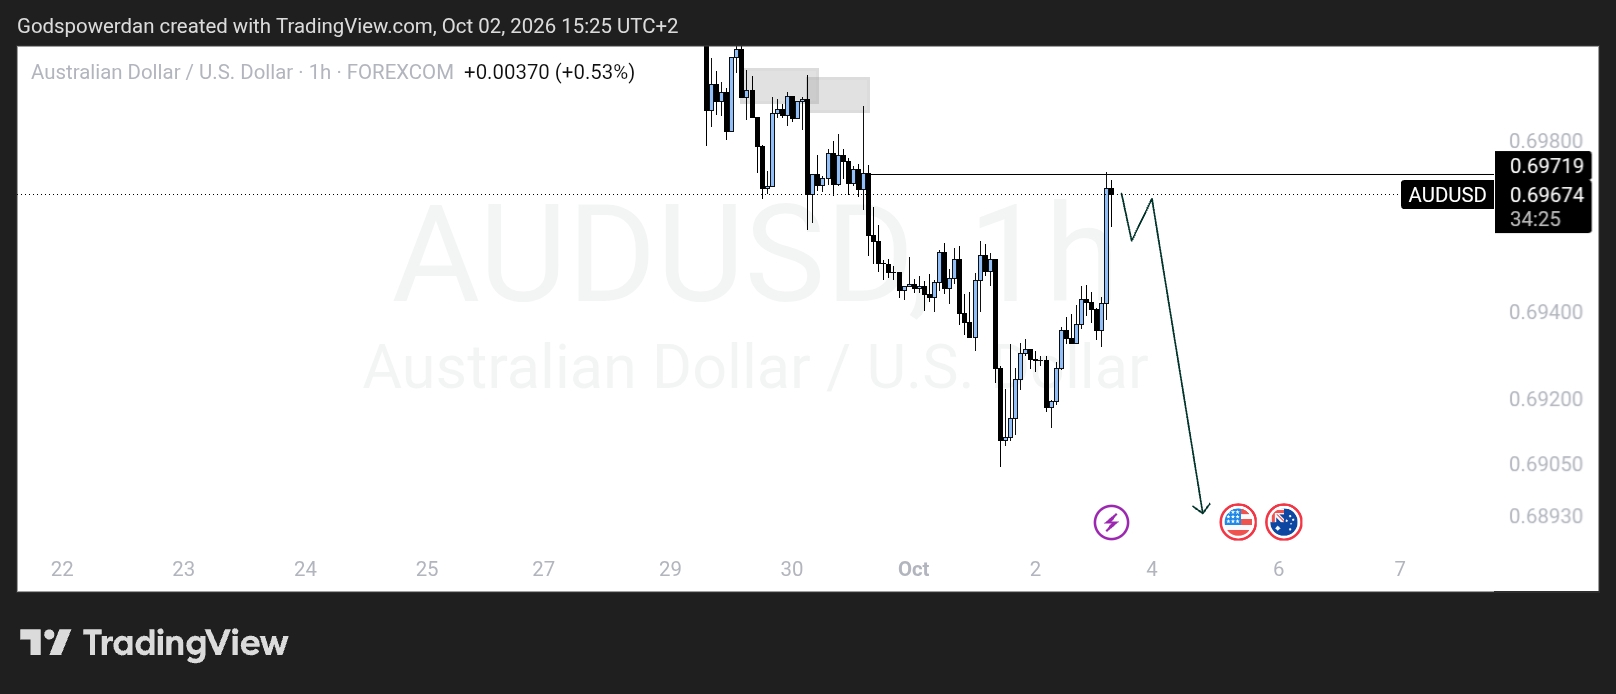
Price is reacting at a key resistance level. I'm watching for bearish confirmation before considering a sell.

📍 Resistance: 0.69674–0.69719

🎯 Potential target: 0.68930

I want to see sellers take control before entering. No confirmation, no trade.

G
@godspowerdan - 1 week ago
Quoted - godspowerdan

📉 AUDUSD SELL WATCH | H1

Price is reacting at a key resistance level. I'm watching for bearish confirmation before considering a sell.

📍 Resistance: 0.69674–0.69719

🎯 Potential target: 0.68930

I want to see sellers take control before entering. No confirmation, no trade.

Price has rallied back into an important resistance area. My focus is on how the market reacts here.

I'm looking for bearish rejection or a lower-timeframe shift in structure before selling.

Key level: 0.69674–0.69719

Downside objective: 0.68930

Patience first. Execution comes after confirmation.

G
@godspowerdan - 1 week ago
Quoted - godspowerdan

Price has rallied back into an important resistance area. My focus is on how the market reacts here.

I'm looking for bearish rejection or a lower-timeframe shift in structure before selling.

Key level: 0.69674–0.69719

Downside objective: 0.68930

Patience first. Execution comes after confirmation.

A key resistance level is being tested, but I'm not selling blindly just because price is there.

My confirmation checklist:

✅ Bearish rejection

✅ Lower-timeframe bearish structure

✅ Clear entry and invalidation

Potential target: 0.68930

Let price confirm the idea before taking the risk.

G
@godspowerdan - 1 week ago
Quoted - godspowerdan

A key resistance level is being tested, but I'm not selling blindly just because price is there.

My confirmation checklist:

✅ Bearish rejection

✅ Lower-timeframe bearish structure

✅ Clear entry and invalidation

Potential target: 0.68930

Let price confirm the idea before taking the risk.

📊 AUDUSD H1 ANALYSIS

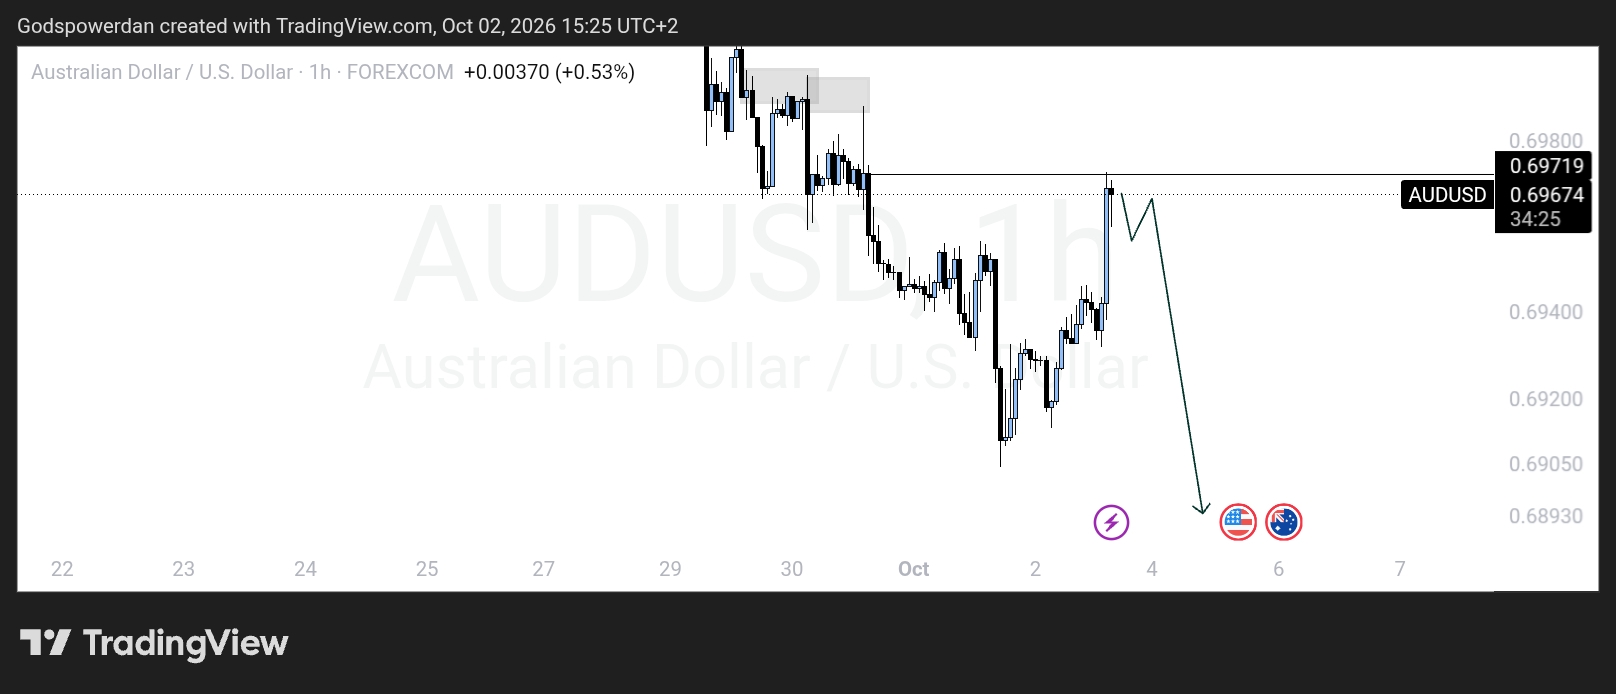
The broader chart shows bearish pressure, while price is retracing toward resistance.

I'm watching the 0.69674–0.69719 area for a possible bearish reaction, with 0.68930 as a potential downside objective.

If buyers break through resistance and hold above it, I'll reassess the sell idea.

Structure over emotion.

G
@godspowerdan - 1 week ago
Quoted - godspowerdan

📊 AUDUSD H1 ANALYSIS

The broader chart shows bearish pressure, while price is retracing toward resistance.

I'm watching the 0.69674–0.69719 area for a possible bearish reaction, with 0.68930 as a potential downside objective.

If buyers break through resistance and hold above it, I'll reassess the sell idea.

Structure over emotion.

WILL SELLERS DEFEND THIS LEVEL? 📉

AUDUSD is approaching a key resistance area, and I'm waiting to see whether sellers show up.

🔎 Watch zone: 0.69674–0.69719

🎯 Potential target: 0.68930

A reaction alone isn't enough. I want confirmation of bearish momentum before considering an entry.

G
@godspowerdan - 1 week ago
Quoted - godspowerdan

WILL SELLERS DEFEND THIS LEVEL? 📉

AUDUSD is approaching a key resistance area, and I'm waiting to see whether sellers show up.

🔎 Watch zone: 0.69674–0.69719

🎯 Potential target: 0.68930

A reaction alone isn't enough. I want confirmation of bearish momentum before considering an entry.

Price is testing resistance after a recovery from the recent lows.

Before entering a sell, I want to see a bearish break of structure or a clear lower-timeframe shift.

Resistance: 0.69674–0.69719

Potential target: 0.68930

The setup is conditional. Risk management comes first.

G
@godspowerdan - 1 week ago
Quoted - godspowerdan

Price is testing resistance after a recovery from the recent lows.

Before entering a sell, I want to see a bearish break of structure or a clear lower-timeframe shift.

Resistance: 0.69674–0.69719

Potential target: 0.68930

The setup is conditional. Risk management comes first.

I'm monitoring AUDUSD at resistance and waiting for a confirmed sell signal.

I won't enter simply because price has reached my key level. I need evidence that bearish momentum is returning.

Potential downside objective: 0.68930.

Wait. Observe. Execute only when the setup is valid.

G
@godspowerdan - 1 week ago
Quoted - godspowerdan

I'm monitoring AUDUSD at resistance and waiting for a confirmed sell signal.

I won't enter simply because price has reached my key level. I need evidence that bearish momentum is returning.

Potential downside objective: 0.68930.

Wait. Observe. Execute only when the setup is valid.

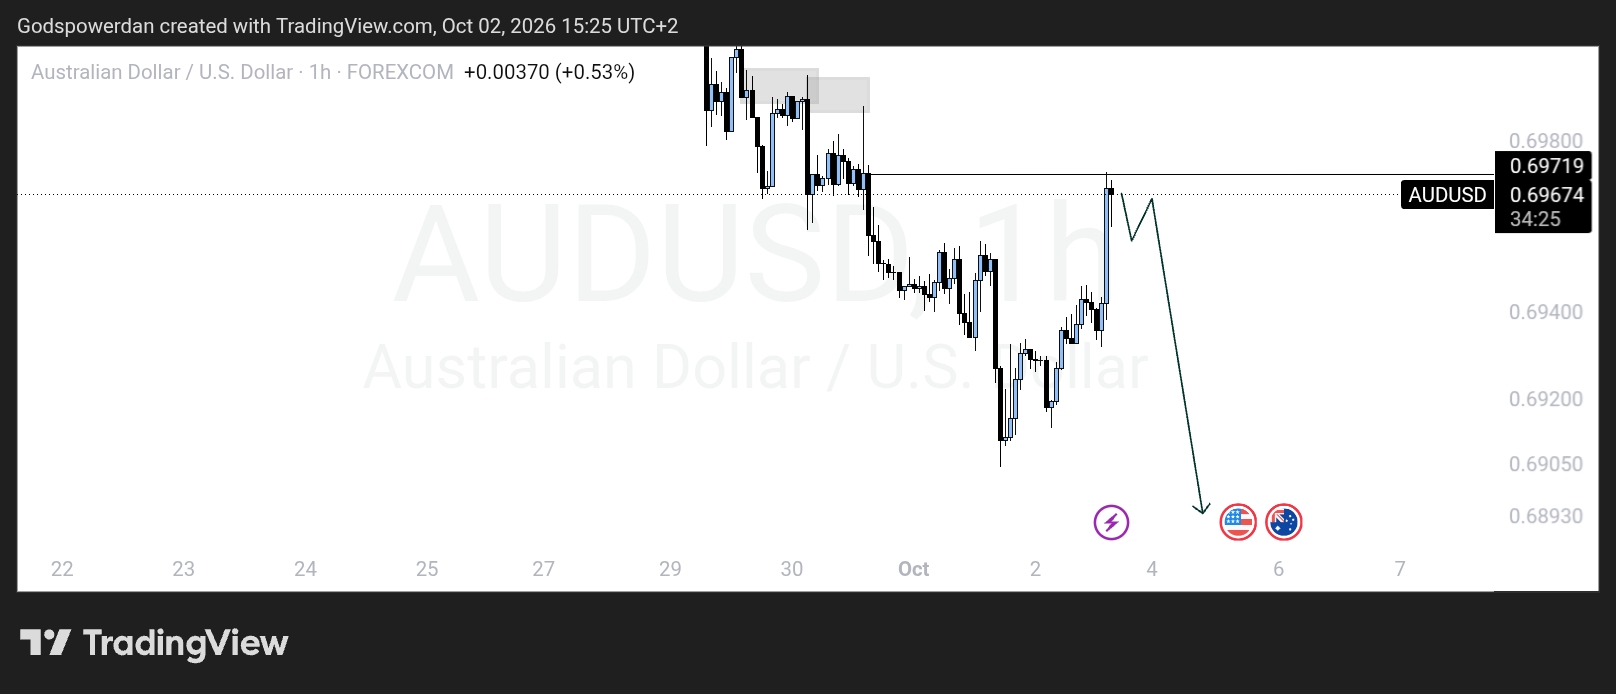
Price is reacting around the 0.69674–0.69719 resistance zone.

My plan is to monitor the reaction and look for a bearish entry trigger, with the recent lows and 0.68930 area on my radar.

If resistance fails, the bearish scenario may no longer be valid.

Confirmation before commitment

G
@godspowerdan - 1 week ago
Quoted - godspowerdan

Price is reacting around the 0.69674–0.69719 resistance zone.

My plan is to monitor the reaction and look for a bearish entry trigger, with the recent lows and 0.68930 area on my radar.

If resistance fails, the bearish scenario may no longer be valid.

Confirmation before commitment

Pair: AUDUSD

Timeframe: H1

Bias: Potential sell from resistance

Key zone: 0.69674–0.69719

Potential target: 0.68930

Entry and stop loss will depend on the confirmation candle and the structure of the setup.

Define risk before entering. Never force a trade.

G
@godspowerdan - 1 week ago
Quoted - godspowerdan

Pair: AUDUSD

Timeframe: H1

Bias: Potential sell from resistance

Key zone: 0.69674–0.69719

Potential target: 0.68930

Entry and stop loss will depend on the confirmation candle and the structure of the setup.

Define risk before entering. Never force a trade.

AUDUSD SELL WATCH

Price is reacting at key resistance.

Zone: 0.69674–0.69719

Bias: Potential sell

Target: 0.68930

Now waiting for bearish confirmation before execution. If the level breaks, I reassess.

No guessing. No chasing. Just price action.

Disclaimer:

At MyTradingLand.com, we connect you with forex brokers and provide a community for traders. While we offer valuable information and resources, please note that we are not financial advisors and cannot provide personalized financial advice. Always conduct your own research and invest responsibly.

Community Guidelines: The MyTradingLand.com community is designed as a resource for forex traders, promoting respectful and constructive discussions. We reserve the right to remove any content that is misleading, abusive, or violates our terms of service.

Broker Information: While we may receive commissions or advertising income from some of the brokers listed, this does not imply an endorsement of any broker, nor does it affect our review process. Our evaluations are based solely on objective criteria and user feedback.

Always verify the regulatory status of any broker with your local financial authority, along with their terms and privacy policies, before engaging with them. It is crucial to conduct thorough research to ensure that you are making informed decisions.

Risk Warning: At MyTradingLand.com, we strive to provide accurate information; however, the forex market is highly volatile and can change rapidly. It is essential to verify any information before making investment decisions.

Please be aware that trading in forex involves substantial risk, and it is possible to lose more than your trading equity/investment capital. 70-90% of retail CFD traders incur losses in their trading activities as per information from various brokers.

You are solely responsible for your use of MyTradingLand.com and any trading decisions you make. We encourage all users to educate themselves thoroughly about forex trading and to consider seeking advice from qualified financial professionals.

Advertising Disclosure: We may earn commissions from recommended brokers, but our reviews are independent (not influenced by potential earnings). Sponsored content is clearly marked and doesn't reflect our views.

©2026 ©2025 All rights reserved Mytradingland.com